You can combine OpenMapTiles with your custom vector data saved in PostGIS database (there is a separate article for data stored in Shapefile or GeoJSON). The easiest way is to convert your data into vector tiles and then combine it with a standard OpenMapTiles source in a map style. The big advantage of this approach is that you don’t need to generate the whole OpenMapTiles schema, which is quite time-consuming.
This approach is a bit more complicated to set up than in the case of data stored in Shapefile or GeoJSON. On the other hand, it gives you even bigger control over tiles generation and you can use SQL syntax a lot of people are familiar with.
Before importing the data into PostGIS
First, you need to install Docker and Docker Compose and clone the OpenMapTiles repository as described here (space and memory requirements are not so high in this case).
Run the database container:
docker compose up -d postgres
or
make start-db
Import the data into PostGIS
Move your data into data/ directory. Modify command where "./data/name.shp" replace with the name of the Shapefile and "name" is the name of the table in PostgreSQL
docker compose run --rm openmaptiles-tools sh -c \
  'ogr2ogr \
    -f "PostgreSQL" \
    PG:"dbname=openmaptiles user=openmaptiles password=openmaptiles host=postgres port=5435" \
    "./data/name.shp" \
    -s_srs EPSG:3035 \
    -t_srs EPSG:3857 \
    -lco OVERWRITE=YES \
    -lco GEOMETRY_NAME=geometry \
    -overwrite \
    -nln "name" \
    -nlt GEOMETRY \
    --config PG_USE_COPY YES'
To check if the data was imported correctly, you can run:
make list-tables
or connect to the PostgreSQL container and check it from inside:
make psql

\dt
Run exit to exit from a container.
Configure OpenMapTiles
The next step is to configure the OpenMapTiles project to generate tiles from your data. Basically, you need to
- create layer definition of your data
- change
openmaptiles.yamlso that it contains only your layer(s) - change
.envwith zoom range and the bounding box of generated tiles
Create custom layer definition
The layer definition might be the most complicated step, depending on how much logic you want to implement. The very simple example consists of two files:
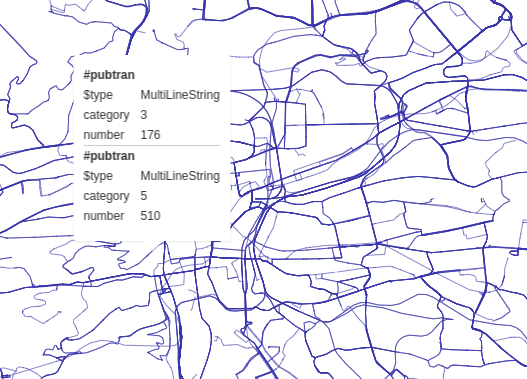
layers/pubtran/pubtran.yaml:
layer:
  id: "pubtran"
  description: |
      Links of Public Transport in Prague.
  buffer_size: 4
  fields:
    number:
      description: |
          Number of the link.
    number:
      description: |
          Category of the link.
  datasource:
    geometry_field: geometry
    query: (SELECT geometry, custom_attribute FROM layer_pubtran(!bbox!, z(!scale_denominator!))) AS t
schema:
  - ./layer.sql
layers/pubtran/layer.sql:
CREATE OR REPLACE FUNCTION layer_pubtran(bbox geometry, zoom_level int)
RETURNS TABLE(geometry geometry, custom_attribute text) AS $$
    SELECT geometry, custom_attribute
    FROM your_table_name
    WHERE geometry && bbox;
$$ LANGUAGE SQL IMMUTABLE;
For a better understanding of this example, check the documentation to get inspiration in defining your own OpenMapTiles layers used in production.
Change openmaptiles.yaml
Change openmaptiles.yaml to contain only your layer(s). It may look like this:
tileset:
layers:
- layers/pubtran/pubtran.yaml
name: OpenMapTiles
version: 3.15.0
id: pubtran
description: "Sample tileset of Prague Public Transportation"
attribution: '<a href="http://opendata.praha.eu" target="_blank">© OpenStreetMap contributors</a>'
center: [14.403076, 50.043029, 4]
maxzoom: 14
minzoom: 0
defaults:
srs: +proj=merc +a=6378137 +b=6378137 +lat_ts=0.0 +lon_0=0.0 +x_0=0.0 +y_0=0.0 +k=1.0 +units=m +nadgrids=@null +wktext +no_defs +over
datasource:
srid: 900913
You should change at least attribution and center properties.
Edit .env
Edit .env with zoom range and bounding box of generated tiles:
BBOX=14.224435,49.941898,14.706787,50.177433

MIN_ZOOM=0
MAX_ZOOM=14
You can get the bounding box easily with http://boundingbox.klokantech.com/.
Generate your tiles
Run these commands to create/update other configuration files needed for generating:
make clean
make
make import-sql
Finally, generate your tiles:
make generate-tiles-pg
Your MBTiles file is now in data/tiles.mbtiles. You can preview it using TileServer-GL:
make start-tileserver
Combine your vector tiles with OpenMapTiles
After creating vector tiles, you can combine them with the standard OpenMapTiles layer in one map style. It can be done in the same way as in the case of raster tiles.